상품상세 정보
[ROB0153] 블랙 클레이디에터 트랙 섀시 로봇 플랫폼(Black Gladiator-Tracked Chassis) 검은 검투사 트랙 섀시 로봇


| 판매가 | 56000 |
|---|---|
| 할인판매가 | 56,000원 (56,000원 할인) |
| 할인금액 | 총 할인금액 원 (모바일할인금액 원) |
| 적립금 |
560원(1.00%)
|
| 배송방법 | 택배 |
| 배송비 | 3,500원 (150,000원 이상 구매 시 무료) |

| 배송 | |
|---|---|
| 수량 |
|
| 상품 정보 | 가격 | 삭제 |
|---|---|---|
| 총상품금액(수량) 0 | ||
| 상품명 | [ROB0153] 블랙 클레이디에터 트랙 섀시 로봇 플랫폼(Black Gladiator-Tracked Chassis) 검은 검투사 트랙 섀시 로봇 |
|---|---|
| 상품요약정보 | Arduino 용 2WD 모바일 로봇 플랫폼은 표준 Arduino 마이크로 컨트롤러 와 함께 사용하기위한 작고 저렴한 모바일 플랫폼입니다 . 로봇은 두 개의 구동 모터, 바퀴 (및 후방 캐스터 볼), 프레임 및 모든 장착 하드웨어를 포함하는 키트로 제공됩니다 |
| 판매가 | 56,000원 |
| 제조사 | DFRobot |
| 원산지 | 해외 |
| 적립금 | 560원 (1%) |
| 상품코드 | P000BPCJ |
| 배송방법 | 택배 |
| 배송비 | 3,500원 (150,000원 이상 구매 시 무료) |
| 수량 |   |
결제 안내
배송 안내
- 배송 방법 : 택배
- 배송 지역 : 전국지역
- 배송 비용 : 3,500원
- 배송 기간 : 2일 ~ 3일
- 배송 안내 :
교환/반품 안내
환불 안내
신용카드로 결제하신 경우는 신용카드 승인을 취소하여 결제 대금이 청구되지 않게 합니다.
(단, 신용카드 결제일자에 맞추어 대금이 청구 될수 있으면 이경우 익월 신용카드 대금청구시 카드사에서 환급처리
됩니다.)
서비스문의 안내
배송기간 이 약 2주 소요 됩니다
해외배송 제품은 주문 후 취소가 불가능 합니다
교환,반품,기술지원 이 불가능 합니다
구매전 이점 꼭 확인해 주세요*
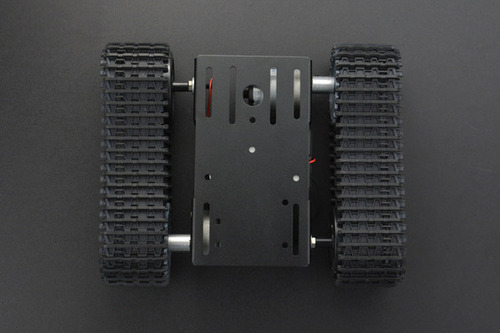
INTRODUCTION
The track is made of engineering plastic that basically assured the good elasticity, excellent damping effect, and large road grip of the product. What’s more, it comes with two quality motors to provide high power and speed, which enables your DIY robot car to widely suit all kinds of road surfaces.
To explore more possibilities, you can use this tracked chassis with Arduino microcontrollers or add other electronic components on the base such as IR sensor, ultrasonic sensor, camera, LED, display, WIFI module, etc. For Arduino fans and smart robot car lovers, this is a good choice for you!
Note: the tracked chassis is unassembled, you need to get it done by yourself.
“Black Gladiator” Tracked Chassis Installation tutorial
Step 1: Install the load-bearing wheel (first install the M4*50 long screw into the load-bearing wheel), and lock the other side with the M4 screw.
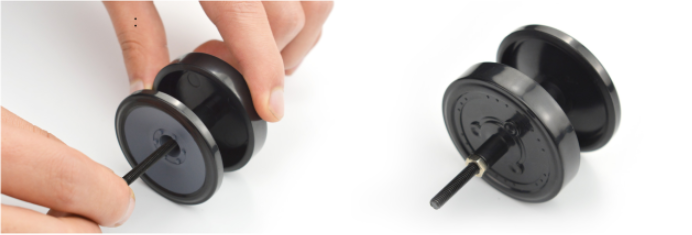
Step2: place the gasket on the bracket and insert the load-bearing wheel into the hole of the bracket; the other end is also fitted with a gasket, which is also locked with the M4 nut. Be careful not to screw the load-bearing wheel too tightly.

Step 3: Insert the motor into the bracket and tighten it with 3 M3*6 flat head screws.

Step 4:Install the drive wheel: firstly insert the coupling into the drive wheel, and at the other end, use the allen key to fit the M3*8 hex socket screw into the drive wheel and lock it with the coupling.

Step 5:Install the drive wheel on the motor and tighten with black screw; please note: the hole on the coupling must be aligned with the flat end of the motor shaft.

Step 6: Remove the track first, remove the excess part of the track, and measure the required track length.

Embed the track pin into the track with a pair of pincers

SPECIFICATION
- Assembled Dimensions: 19.3*16.3*6cm(L*W*H)/7.60*6.42*2.36”
- Net Weight: 0.47kg
- Base Material: aluminium alloy 2mm
- Surface Treatment: sandblasting oxidation
- Track: engineering plastic
- Wheel: plastic
- Package Includes:
Base: 1
Motor: 2
Track: 2
Bearing Wheel: 2
Drive Wheel: 2
Screw Accessory: 1 set
Hex Wrench
Battery Holder: 1 - Motor parameter
Voltage Range: 6V-12V
No-load Speed: 170-350RPM
Nominal Voltage: DC 12V
No-load Current: 100mA
Weight: 100g
PROJECTS
How To Make DIY Arduino Traffic Sign Recognition Robot
How To Make DIY Arduino Bluetooth Controlled Robot At Home
More:
Terminator HK ~ Arduino & Raspberry Pi Robotics Project | 314Reactor
SHIPPING LIST
Black Gladiator-Tracked Chassis x1